At Contrado, we are pretty lucky. Not only do we get to work with truly inspirational artists, but also wonderful crafters. They are amazing at turning our fabric into some of the best craft tutorials we have ever seen.
We work with talented DIY masters, sewers, crafters, and makers from all around the world. These creative artists are able to turn our custom printed fabric into the most incredible things. From fashion and homeware to children’s clothes and accessories. There is nothing that this team of innovators can’t craft!
Meet the Contrado Creators
With so many brilliant tutorials being created featuring our own customised fabrics, we wanted to introduce these crafters to the Contrado audience. The Contrado Creators showcase the best crafting abilities. They are great at making their tutorials easy to follow, and, most importantly, fun! Whether you are new to the world of DIY, want to take up a new hobby, love sewing but don’t know how to get started with unique projects, then our Creators are here for you.
This new blog series will highlight some of our favourite bloggers, and their tutorials. Each one has been created using Contrado fabric. These craft tutorials cover so many different areas, that you will want to try them all.
This week, we are focusing on 5 bloggers, and their craft tutorials.
1. My So Called Crafty Life – Custom Neoprene Coasters

We absolutely love Ashlee from My So Called Crafty Life’s sweet and vintage inspired DIY craft tutorials. Many of them are easy enough for even complete novices to follow, and get stunning results. Christmas stockings, blankets, keyrings, washmitts, and (a personal favourite) nail polish characters.
The project Ashlee worked with us to create, was custom neoprene coasters. What a unique and innovative way to use neoprene! This fabric is natural tough, flexible, waterproof, and thick, making it an ideal material for coasters. The custom photo coasters Ashless created in her craft tutorial look gorgeous, and show off photos of her adorable family perfectly. Here’s a quick run through how of Ashlee’s tutorial, but make sure you read the whole thing before trying it out yourself.
Basic Tutorial
- Choose your photos and crop each one to a 4 inch square. Move them onto a large blank file in Photoshop.
- Turn on the grid option, so the spacing is even, with about half an inch between each photo.
- Crop any excess blank space around the edges.
- Upload your saved design onto the Custom Neoprene page on Contrado.
- Choose your custom dimensions.
- Once you receive your fabric, cut the coasters out. Ashlee used a quilting ruler, self-healing mat, and a rotary cutter. Sharp scissors work well too.
- Display your coasters as you wish.
We told you it was easy, and they look great!
2. Snugglebug University – One of a Kind Throw Pillows
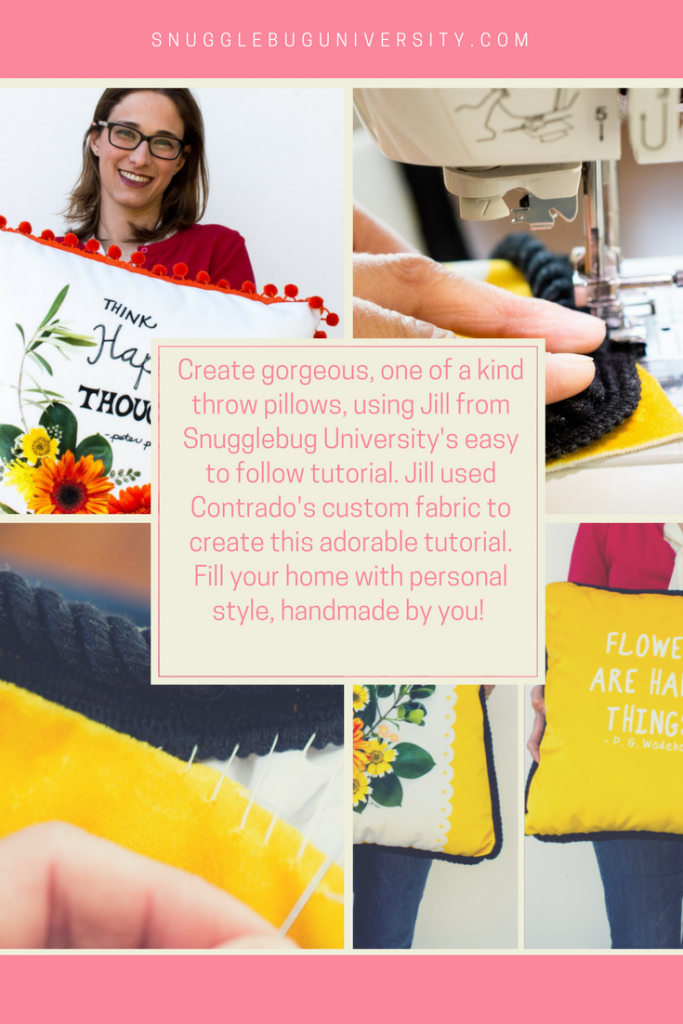
Featuring a mix of sewing tutorials, patterns, projects for the home and kid’s crafts, Snugglebug University is a great place to spend the day. Jill loves to print on fabric, try out new projects and techniques and get creative making things. You can create story blocks, fairy puppets, canopies, handbags, clothing and more using her craft tutorials.
We worked with Jill on this craft project, creating customised Velvet Shimmer fabric for her DIY throw cushions tutorials. These cushions are perfect for scattering around your home. Prop them up on your bed, set them on couches and chairs, or even give them as personalised gifts. They look extremely professional, but even beginner sewers should be able to create them, thanks to Jill’s easy to follow guide. Here’s a breakdown of the steps, but we recommend visiting Jill’s blog to read the full tutorial.
Basic Tutorial
- Create your design and upload it onto the fabric of your choice. Jill opted for Velvet Shimmer, which gives these cushions a truly luxurious finish.
- Once you receive your fabric, measure each side of your cushion padding.
- Cut 2 squares of fabric exactly this size.
- Choose your trim.
- Jill recommends multiplying the side of the square cushion 4 times, and a few extra inches for wriggle room.
- Place your trim on the bottom corner of the cushion.
- Using your sewing machine, stitch the trim onto the cushion edge.
- Cut off any excess trim.
- Place the cushion back on top of the cushion front so the right sides are together
- Sew all around 3 sides of the pillow.
- Clip the curves being careful not to cut the seams.
- Turn right side out.
- Insert the cushion padding.
- Use a whipstitch to close the base of the cushion.
- Tie a knot at the end and push the needle through the side of the cushion.
- Finished! Enjoy your cushions.
3. How Good Is That? – Terrigal Swimsuit Tutorial

This super creative blog features brilliant tutorials, ranging from easy to complex for the more experienced sewers and crafters. Maria Oliver shows us how we can make pretty much everything we wear, and each tutorial leaves us hankering to start creating.
With this craft tutorial, we worked with Maria to create her own terrigal swimsuit. Maria was astounded that she could print her own fabric, using a photo from her phone! The results are great – eye-catching, unique, and personal to her. Here’s how she was able to create her own swimsuit, using our Slinky Matt Lycra fabric.
Basic Tutorial
- Select or make your swimsuit pattern.
- Select your design up upload it onto the fabric of your choice on Contrado.
- Maria chose to use the Slinky Matt Lycra, which is a great choice for swimwear.
- Print 3 panels of 0.5m long x 145cm wide.
- Once your fabric arrives, it needs to be cut to match the chosen pattern.
- Maria added powermesh lining for the bust shelf.
- Sew your swimsuit as dictated in the pattern.
- Enjoy flaunting your figure in your brand new custom swimsuit.
4. Bugaboo City – DIY Art Smock Created with Kid’s Artwork
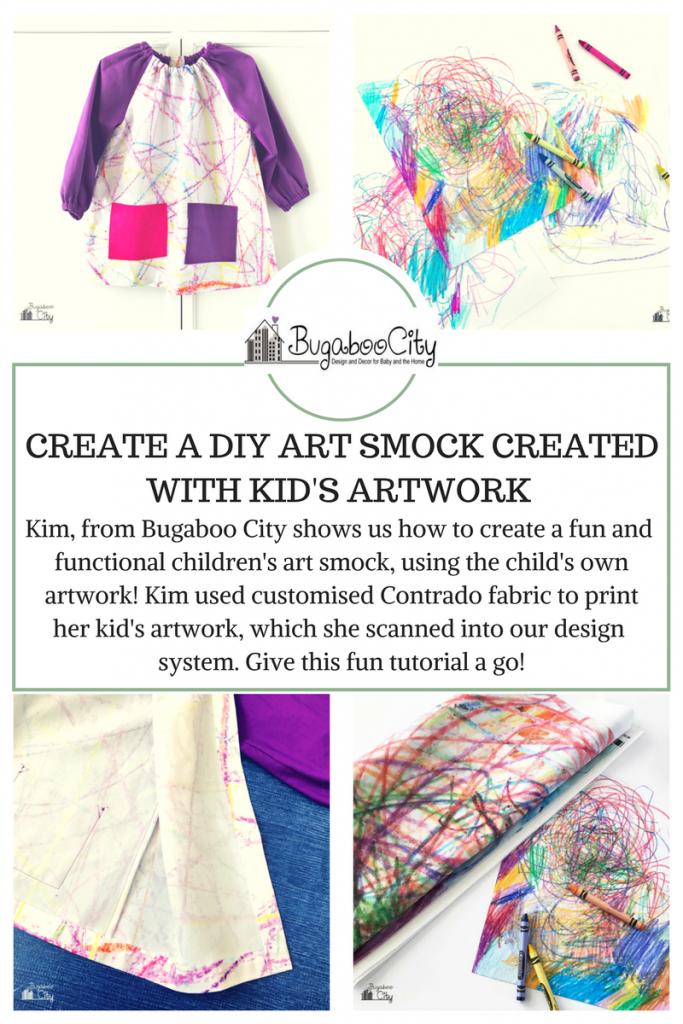
Kim from Bugaboo City creates fun craft projects for everyone. You can take your pick from kid’s crafts, baby ideas, sewing projects, garden and sports crafts, DIY party ideas, and just loads more. The tutorials are addictive to read and will give you craft inspiration for days.
The project we worked with Kim on was a DIY art smock for children. But this smock had something a little extra special about it. It is made using artwork already created by the child. By using our customised fabric printing service, Kim was able to print her children’s art onto fabric, and then turn them into these adorable smocks.
Basic Tutorial
- Get your kids involved by letting them draw pictures, make a painting or anything else they want, on paper.
- It is best to use a piece of paper measuring 8.5 x 11 inches so you can scan it easily.
- Scan the artwork into your computer.
- Upload your design onto the fabric of your choice on the Contrado website.
- Kim opted for Lima Cotton Lawn.
- Choose your length and width (Kim has more about this on her blog).
- Choose contrasting fabric for the sleeves and trim.
- Sew the smock using an art smock pattern.
- Let your kids get mucky in their new customised smocks!
5. Oh Oh Blog – How to Sew a Crib Bumper and Baby Blanket
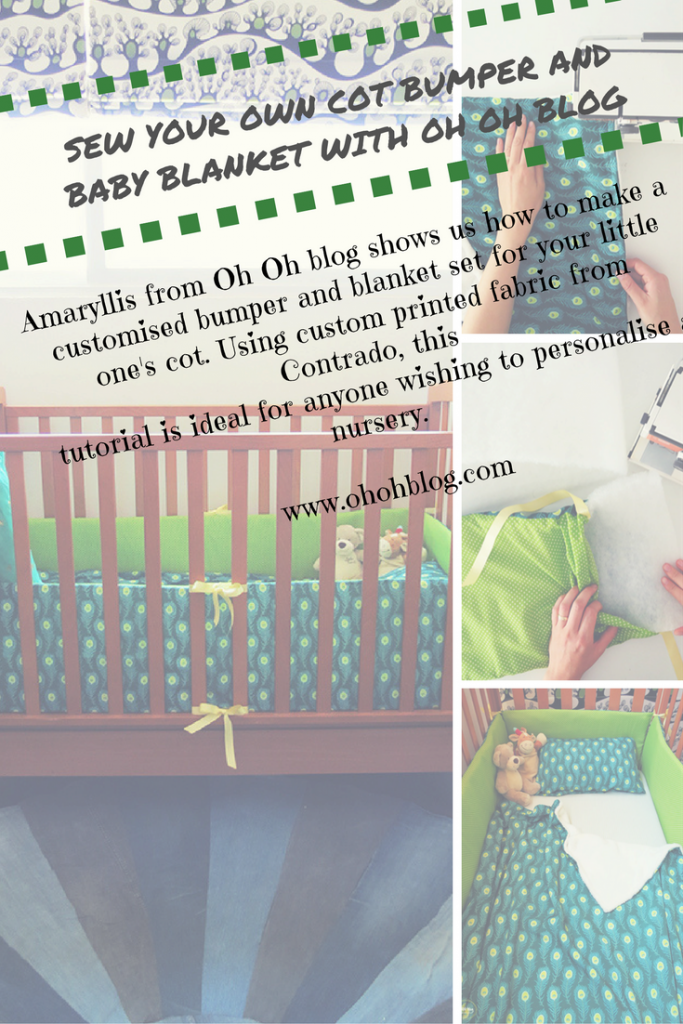
DIY jewellery, beautiful sewing tutorials, home decor ideas and stunning photography makes Oh Oh Blog stand out. Amaryllis creates gorgeous craft tutorials, which will keep you and your home looking fabulous. With this tutorial, we teamed up with Amaryllis to create a cot bumper and baby blanket for her baby.
This project is ideal for anyone looking to give their baby’s nursery a unique and personal touch. You can customise your design to show off your baby’s name, the sex, or just to create something, which no shop will offer. We love that Amaryllis created both the bumpers and a blanket, to give the cot an utterly unique look.
Basic Tutorial
- Take your cots internal dimensions.
- Decide on the print of your fabric and upload your design onto the chosen fabric on the Contrado website.
- Once you receive your fabric, cut 4 rectangles in the outside fabric.
- All rectangles must have the same height, 2 need to be the same length of the cot, and 2 the same width.
- Place 2 small rectangles on top of each other, right side inward – pin the edges.
- Cut 4 pieces of ribbon to approximately 40cm.
- Put one on each corner between the fabric layer and pin.
- Sew the edges on 3 sides, leaving of of the small sides open.
- Repeat to make a second small bumper.
- Repeat the same process with the long bumpers, adding 3 extra ribbon pieces in the centre.
- Turn fabric rectangles right side out.
- Cut wading foam at the same dimension and fill the fabric with the foam.
- Fold the edges, pin and sew.
- Attach each bumper to the crib using the ribbons.
- To learn how to make the matching baby blanket, make sure you check out Amaryllis’ blog!
Have you been inspired to create after reading these craft tutorials? If so, make sure you check back on the blog again soon, where we will be showcasing another group of talented Contrado Creators. Thanks so much to these wonderful bloggers for working with us. If you want to become a #ContradoCreator and be featured on the blog, then click here.